- JumpCloud Community
- Repo
- Community Scripts
- New-JCPolicy/ Set-JCPolicy — Create and update Jum...
- Subscribe to RSS Feed
- Mark Topic as New
- Mark Topic as Read
- Float this Topic for Current User
- Bookmark
- Subscribe
- Mute
- Printer Friendly Page
New-JCPolicy/ Set-JCPolicy — Create and update JumpCloud Policies with the PowerShell Module
- Mark as New
- Bookmark
- Subscribe
- Mute
- Subscribe to RSS Feed
- Permalink
- Report Inappropriate Content
05-01-2023 02:44 PM - edited 05-01-2023 03:10 PM
Two new JumpCloud PowerShell Module functions have been added to the module to help administrators create and update device policies. In this post I'll cover the general use of these new functions and provide a scripted example to create & scope a set of default policies.
Jumping right in, `New-JCPolicy` and `Set-JCPolicy` are the two functions to be covered in the contents of this post. New-JCPolicy is used to create net new policies from templates within a given JumpCloud organization. Set-JCPolicy is used to edit existing JumpCloud policies. Both functions provide dynamic parameter sets accessed through IntelliSense or by pressing the `tab` key while using the function.
Policy Template Names
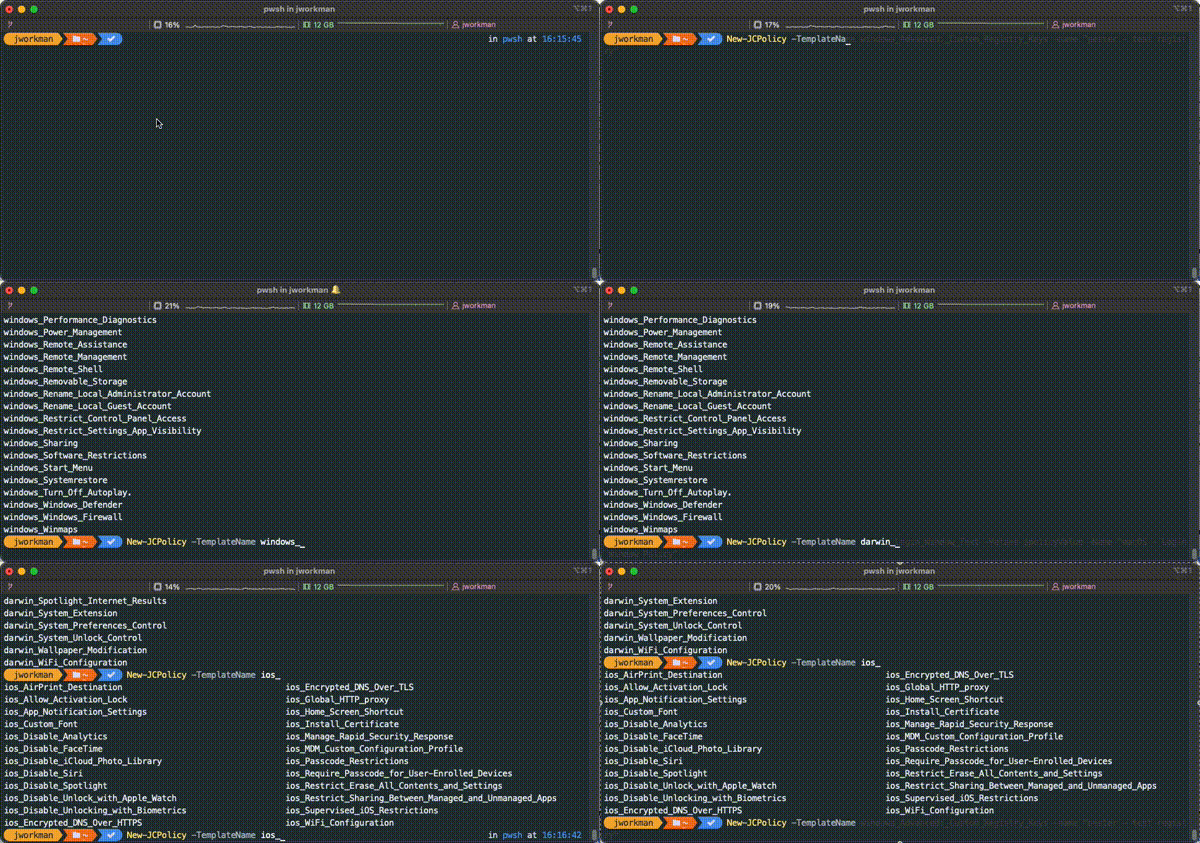
New-JCPolicy policy templates can be accessed using the dynamic generated set of template names after running Connect-JCOnline. In the GIF below, pressing the `tab` key after typing `New-JCPolicy -TemplateName ` will display available policy templates sorted by OS Family then template name.
Policy Template Parameters
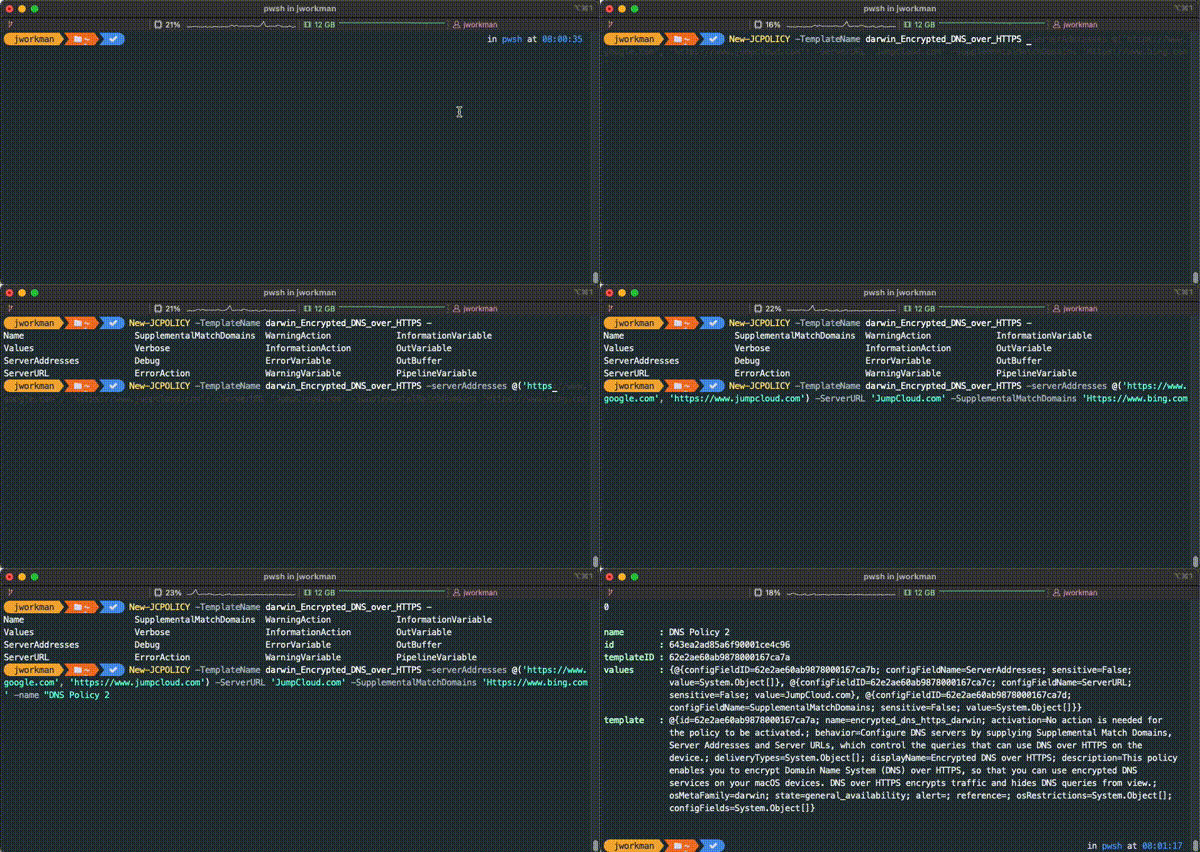
Each policy in jumpcloud has a different set of policy parameters, the New/Set-JCPolicy cmdlets will populate these parameters with the help of the `tab` key. After identifying a policy by ID/ Name, pressing the `tab` key will populate the possible parameters for the given policy.
Interactive Policy Editor
Each policy can be created/ edited with the interactive policy editor which dynamically prompts for policy value input based on the policy or policy template provided.
Custom Windows Registry Policies
New/Set-JCPolicy functions enable admins to quickly share, create and modify Windows Custom Registry Policies. The policy template for custom Windows registry policies accepts a list of values formatted like the code snippet below:
$RegValue = @{
	'customData' = '0';
	'customRegType' = 'DWORD';
	'customLocation' = 'SYSTEM\CurrentControlSet\Control\PriorityControl';
	'customValueName' = 'ConvertibleSlateMode'
}
To create a policy with that single registry entry row, we can run:
New-JCPolicy -templateName windows_Advanced:_Custom_Registry_Keys -name "Registry - Convertible Slate Mode" -customRegTable $RegValue
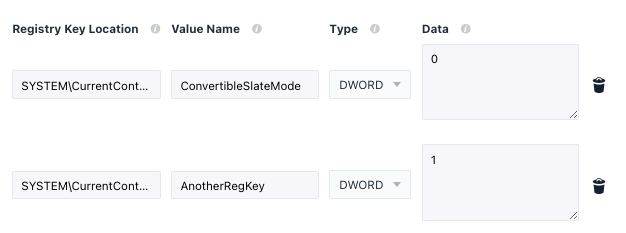
This would create a new policy with the following registry payload:
Multiple values can of course be set at the same time. There are a few ways to do this. First and foremost, we can copy the existing values of a policy and add new rows of data.
# Get the policy we just set in the previous example:
$policy = Get-JCPolicy -Name "Registry - Convertible Slate Mode"
# Create an empty list
$regValues = new-object System.Collections.ArrayList
# Add single value from previous policy to the list
$regValues.Add($policy.Values.Value)
# Add another registry set to the list:
$regValues.Add([PSCustomObject]@{
	'customData' = '1';
	'customRegType' = 'DWORD';
	'customLocation' = 'SYSTEM\CurrentControlSet\Control\PriorityControl';
	'customValueName' = 'AnotherRegKey'
})
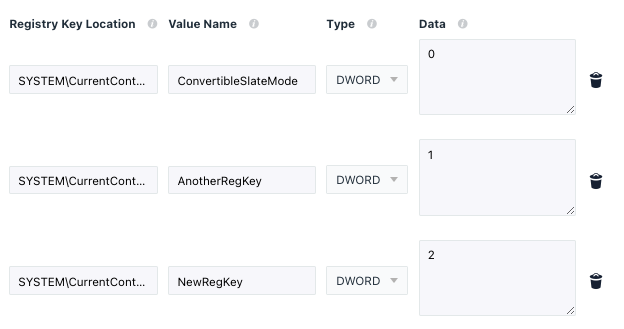
The $regValues variable now contains two rows of data.
To update our existing policy with both rows of registry entries, we can run:
Set-JCPolicy -Name "Registry - Convertible Slate Mode" -customRegTable $RegValues
The policy we set earlier will be updated with a new set of registry rows containing the data from our $regValues variable.
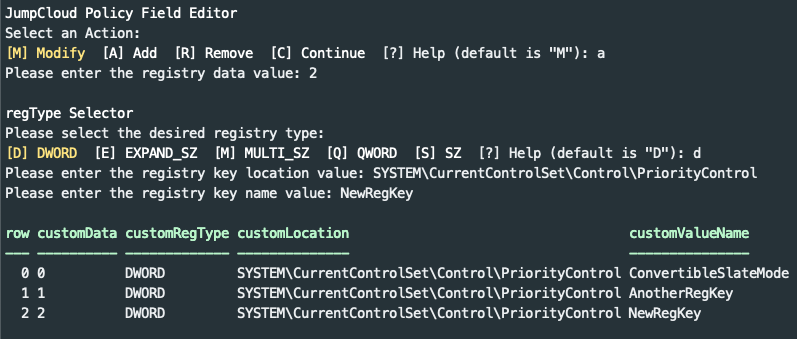
Alternatively, administrators can follow the interactive prompts to add/ modify and remove registry rows. Running Set-JCPolicy without any additional parameters will drop into the interactive policy editor.
Saving the policy in the editor will update the policy with the existing and new values
Scripted Registry Policy Templates
MSPs may have interest in templating registry policies or policies in general. New/Set-JCPolicy provides administrators a way to ‘template’ their standard policy set. Here’s a script template containing out-of-box policies (including custom registry policies) which could be used to set default policies on for new organizations.
This script assumes two default system groups have already been setup, the IDs of those system groups are assigned in lines 4 & 6 of the script below. The script will create macOS and Windows policies and assign those policies to systems bound to the default macOS and Windows groups.
# This script will create a standard set of policies on a new organization.

# Default System Group for MacOS Policies to be assigned
$defaultMacOSGroupID = '644952acb26054000119bee9'
# Default System Group for Windows Policies to be assigned
$defaultWindowsGroupID = '6449529e42cd86000183205f'

# Create macOS policies & Assign each new policy to the default mac system group id

# Set login window to only display username/password
$m_login = New-JCPolicy -TemplateName darwin_Login_Window_Controls -SHOWFULLNAME $true -Name "Default Policy - Login Controls"
New-JCAssociation -id $m_login.id -type policy -targetType system_group -TargetId $defaultMacOSGroupID -Force
# Lock screen after 15 mins (900) seconds of inactivitity
$m_lock = New-JCPolicy -templateName darwin_Lock_Screen -timeout 900 -Name "Default Policy - Lock Screen"
New-JCAssociation -id $m_lock.id -type policy -targetType system_group -TargetId $defaultMacOSGroupID -Force
# Disable Siri
$m_siri = New-JCPolicy -TemplateName darwin_Disable_Siri -Name "Default Policy - Disable Siri"
New-JCAssociation -id $m_siri.id -type policy -targetType system_group -TargetId $defaultMacOSGroupID -Force
# Disable Built In Guest Account
$m_guest = New-JCPolicy -TemplateName darwin_Disable_Guest_Account -Name "Default Policy - Disable Guest Account"
New-JCAssociation -id $m_guest.id -type policy -targetType system_group -TargetId $defaultMacOSGroupID -Force

# Create windows Policies & Assign each new policy to the default windows system group id

# Disable Built In Guest Account
$w_guest = New-JCPolicy -TemplateName windows_Built-in_Guest_Account_Status -DISABLEBUILTINGUESTACCOUNT $true -Name "Default Policy - Disable Guest Account"
New-JCAssociation -id $w_guest.id -type policy -targetType system_group -TargetId $defaultWindowsGroupID -Force
# Disable Cortana
$w_cortana = New-JCPolicy -templateName windows_Disable_Cortana -Name "Default Policy - Disable Cortana"
New-JCAssociation -id $w_cortana.id -type policy -targetType system_group -TargetId $defaultWindowsGroupID -Force
# Lock screen after 15 mins (900) seconds of inactivitity
$w_lock = New-JCPolicy -templateName windows_Lock_Screen -timeout 900 -Name "Default Policy - Lock Screen"
New-JCAssociation -id $w_lock.id -type policy -targetType system_group -TargetId $defaultWindowsGroupID -Force
# Prevent fast user switching/ block user from Showing account details on login
$w_userSwitch = New-JCPolicy -TemplateName windows_Logon -HideFastUserSwitching $true -BlockUserFromShowingAccountDetailsOnSignin $true -Name "Default Policy - Disable Fast User Switch"
New-JCAssociation -id $w_userSwitch.id -type policy -targetType system_group -TargetId $defaultWindowsGroupID -Force
# Do not show last username
$w_lastName = New-JCPolicy -TemplateName windows_Do_Not_Display_Last_Username_on_Logon_Screen -DONOTDISPLAYLASTUSERLOGON $true -Name "Default Policy - Do Not Display Last Logon User"
New-JCAssociation -id $w_lastName.id -type policy -targetType system_group -TargetId $defaultWindowsGroupID -Force
# Set a windows registry policy
$regValues = New-Object System.Collections.ArrayList
# Blocks external Chrome extensions from being installed
$regValues.Add(
    [PSCu…
- Labels:
-
PowerShell
New to the site? Take a look at these additional resources:
Ready to join us? You can register here.
- Leveraging JumpCloud Alerting to monitor Windows event logs for service crashes in Community Scripts
- The Script (GUI) for install JumpCloud agent and bind the user to device (Windows) in Community Scripts
- New PowerShell Function: Get-JCAdmin - Audit admins in your organization(s) in Community Scripts
- [PowerShell] BitLocker2Barcode - a script to acquire a BitLocker Recovery Key from JumpCloud and display as barcodes in Community Scripts
- [PowerShell] How to bulk import Custom Policies from Registry Files based on GPO's (update considering previous articles) in Community Scripts
