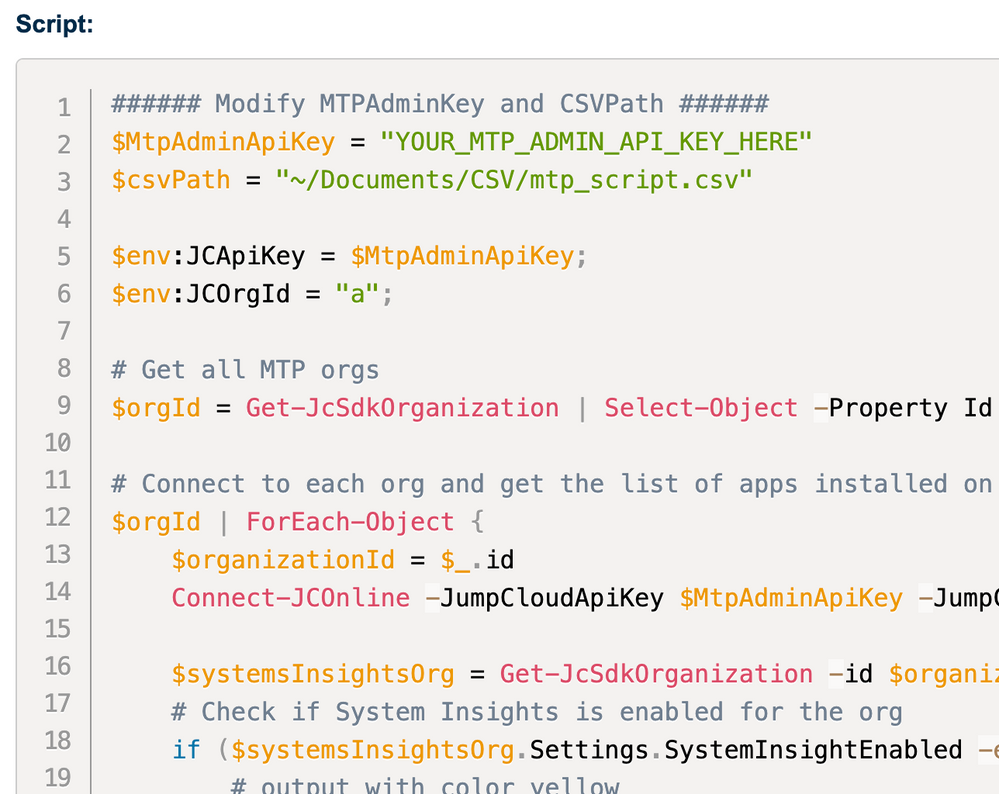
PowerShell: How to create a new UserGroup with Custom Reply Attributes for RADIUS (via JSON array or CSV-Import)
- Mark as New
- Bookmark
- Subscribe
- Mute
- Subscribe to RSS Feed
- Permalink
- Report Inappropriate Content
05-03-2023 04:07 AM
Hello Community Folks
Did you know that JumpCloud supports Reply Attributes for RADIUS on User Groups? (KB here)
...and why though?
The most common ones from my experience are:
-
Role-based access control (RBAC): Assigning users to specific roles (e.g., employee, guest, or admin) based on their authentication credentials. This can be used to grant different levels of access to network resources and services.
-
VLAN assignment: Dynamically assigning users to specific VLANs based on their authentication credentials or other criteria. This can help segregate network traffic and improve security.
-
Quality of Service (QoS) enforcement: Applying QoS policies to users or devices based on their authentication credentials or other criteria. This can help prioritise network traffic and ensure that critical applications receive the necessary bandwidth.
So, how do I get and configure such attributes?
The Internet Engineering Task Force (IETF) has specified standard attributes here:
- RFC2865
- RFC2866 (for Accounting)
Then there are a ton of VSA's which you can use with your respective hardware and appliances.
For example one of many by Cisco, PaloAlto, Ruckus, and Meraki.
JumpCloud hasn't pre-populated any of such dictionaries and you can configure them via the UI or API.
Via the UI might be a bit cumbersome if you have many of them or you want to apply them to multiple groups.
So I thought, it would be nice to do this via PowerShell by either passing a JSON array with the names and values of each attribute, or even more convenient by importing a CSV-file.
The respective endpoint for a new user group can be found here:
{
  "attributes": {
    "sudo": {
      "enabled": true,
      "withoutPassword": true
    },
    "ldapGroups": [
      {
        "name": "string"
      }
    ],
    "posixGroups": [
      {
        "id": 0,
        "name": "string"
      }
    ],
    "radius": {
      "reply": [
        {
          "name": "string",
          "value": "string"
        }
      ]
    },
    "sambaEnabled": true
  },
  "description": "string",
  "email": "string",
  "memberQuery": {
    "queryType": "FilterQuery",
    "filters": [
      {
        "field": "string",
        "operator": "eq",
        "value": "string"
      }
    ]
  },
  "memberQueryExemptions": [
    {
      "attributes": {},
      "id": "string",
      "type": "string"
    }
  ],
  "memberSuggestionsNotify": true,
  "membershipAutomated": true,
  "membershipMethod": "NOTSET",
  "name": "string"
}
Which looks like this in PowerShell (not using the Module):
$headers=@{}
$headers.Add("x-org-id", "SOME_STRING_VALUE")
$headers.Add("x-api-key", "REPLACE_KEY_VALUE")
$headers.Add("content-type", "application/json")
$response = Invoke-RestMethod -Uri 'https://console.jumpcloud.com/api/v2/usergroups' -Method POST -Headers $headers -ContentType 'application/json' -Body '{"attributes":{"sudo":{"enabled":true,"withoutPassword":true},"ldapGroups":[{"name":"string"}],"posixGroups":[{"id":0,"name":"string"}],"radius":{"reply":[{"name":"string","value":"string"}]},"sambaEnabled":true},"description":"string","email":"string","memberQuery":{"queryType":"FilterQuery","filters":[{"field":"string","operator":"eq","value":"string"}]},"memberQueryExemptions":[{"attributes":{},"id":"string","type":"string"}],"memberSuggestionsNotify":true,"membershipAutomated":true,"membershipMethod":"NOTSET","name":"string"}'
My generic Reply-Attributes used here are as an example:
name,value
Service-Type,Framed-User
Framed-Protocol,PPP
Framed-IP-Address,192.168.1.100
Framed-IP-Netmask,255.255.255.0
Framed-Routing,None
Filter-Id,example-filter
Framed-MTU,1500
Framed-Compression,Van-Jacobson-TCP-IP
Login-IP-Host,192.168.1.2
Login-Service,Telnet
Login-TCP-Port,23
Reply-Message,Welcome to the network!
Callback-Number,555-1234
Callback-Id,cb123
Framed-Route,192.168.2.0/24 192.168.1.1 1
Framed-IPX-Network,00000001
State,0x0123456789abcdef
Class,0x010203040506
Session-Timeout,3600
Idle-Timeout,1800
Termination-Action,Default
Called-Station-Id,00-11-22-33-44-55
Calling-Station-Id,00-66-77-88-99-AA
NAS-Identifier,nas-001
Proxy-State,0x9876543210abcdef
Login-LAT-Service,LAT service name
Login-LAT-Node,LAT node name
Login-LAT-Group,LAT group name
Framed-AppleTalk-Link,1
Framed-AppleTalk-Network,65280
Framed-AppleTalk-Zone,Zone 1
Which look likes this once converted to a Custom JSON Object in PowerShell:
$radiusAttributes = @"
{
  "reply": [
    {"name": "Service-Type", "value": "Framed-User"},
    {"name": "Framed-Protocol", "value": "PPP"},
    {"name": "Framed-IP-Address", "value": "192.168.1.100"},
    {"name": "Framed-IP-Netmask", "value": "255.255.255.0"},
    {"name": "Framed-Routing", "value": "None"},
    {"name": "Filter-Id", "value": "example-filter"},
    {"name": "Framed-MTU", "value": "1500"},
    {"name": "Framed-Compression", "value": "Van-Jacobson-TCP-IP"},
    {"name": "Login-IP-Host", "value": "192.168.1.2"},
    {"name": "Login-Service", "value": "Telnet"},
    {"name": "Login-TCP-Port", "value": "23"},
    {"name": "Reply-Message", "value": "Welcome to the network!"},
    {"name": "Callback-Number", "value": "555-1234"},
    {"name": "Callback-Id", "value": "cb123"},
    {"name": "Framed-Route", "value": "192.168.2.0/24 192.168.1.1 1"},
    {"name": "Framed-IPX-Network", "value": "00000001"},
    {"name": "State", "value": "0x0123456789abcdef"},
    {"name": "Class", "value": "0x010203040506"},
    {"name": "Session-Timeout", "value": "3600"},
    {"name": "Idle-Timeout", "value": "1800"},
    {"name": "Termination-Action", "value": "Default"},
    {"name": "Called-Station-Id", "value": "00-11-22-33-44-55"},
    {"name": "Calling-Station-Id", "value": "00-66-77-88-99-AA"},
    {"name": "NAS-Identifier", "value": "nas-001"},
    {"name": "Proxy-State", "value": "0x9876543210abcdef"},
    {"name": "Login-LAT-Service", "value": "LAT service name"},
    {"name": "Login-LAT-Node", "value": "LAT node name"},
    {"name": "Login-LAT-Group", "value": "LAT group name"},
    {"name": "Framed-AppleTalk-Link", "value": "1"},
    {"name": "Framed-AppleTalk-Network", "value": "65280"},
    {"name": "Framed-AppleTalk-Zone", "value": "Zone 1"}
  ]
}
"@@
Once I'm having this Custom Object, it's relatively straight forward to construct the remaining script which can pass everything over to JumpCloud via API's.
The full body then looks like this:
# Define API body with the custom RADIUS attributes object
$body = @"
{
  "attributes": {
    "radius": $radiusAttributes
  },
  "description": "Test Group for RADIUS",
  "email": "test@example.com",
  "memberQuery": {
    "queryType": "FilterQuery",
    "filters": [
      {
        "field": "email",
        "operator": "eq",
        "value": "test@example.com"
      }
    ]
  },
  "memberQueryExemptions": [],
  "memberSuggestionsNotify": true,
  "membershipAutomated": true,
  "membershipMethod": "DYNAMIC_AUTOMATED",
  "name": "Group for RADIUS testing: dynamic automated"
}
"@@
...and lastly the actual POST call:
# Make the POST API call to create the new group
$response = Invoke-RestMethod -Uri 'https://console.jumpcloud.com/api/v2/usergroups' -Method POST -Headers $headers -ContentType 'application/json' -Body $body
If you prefer to use the CSV-Import method instead, the script is almost identical, but the Custom Object with the array is replaced by this:
# Import RADIUS attributes from a CSV file
$csvFilePath = "radiusattributes.csv"
$importedAttributes = Import-Csv -Path $csvFilePath

# Convert imported attributes to JSON format
$radiusAttributes = @{
  "reply" = $importedAttributes
} | ConvertTo-Json
You can find both versions and the CSV-file on my Github:
- JC - Create User Group with Reply Attributes from JSON array - public.ps1
- JC - Create User Group with Reply Attributes from CSV file - public.ps1
- radiusattributes.csv
Once your script of choice is executed, you end up with a new User Group like this:

Thanks for reading as usual. Have fun!
- Juergen
- Labels:
-
API
-
PowerShell