Disclaimer
JUMPCLOUD EXPRESSLY DISCLAIMS ALL REPRESENTATIONS, WARRANTIES, CONDITIONS, AND LIABILITIES OF ANY KIND ARISING FROM OR RELATED TO THIRD-PARTY SOFTWARE, SCRIPTS, REPOSITORIES, AND APIS. JUMPCLOUD IS NOT REQUIRED TO SUPPORT ANY SUCH THIRD-PARTY MATERIALS AND ALL RISKS RELATED TO THIRD-PARTY MATERIALS ARE YOUR RESPONSIBILITY. PLEASE ALSO REVIEW THE JUMPCLOUD TOS.
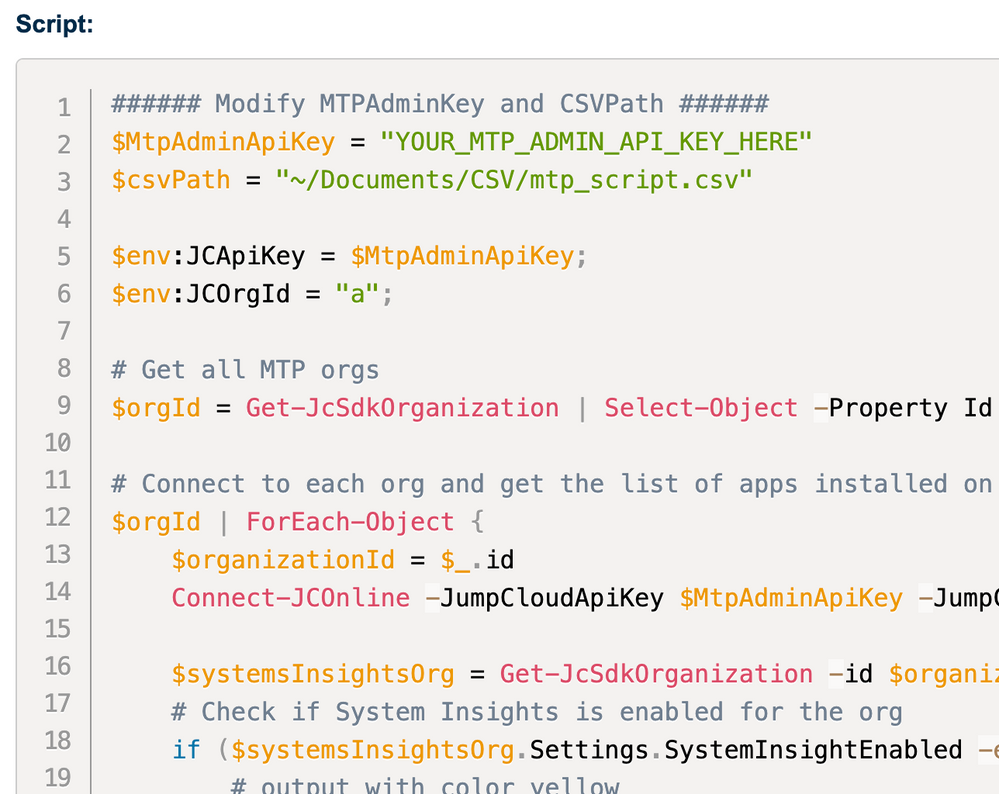
[PowerShell] Got OrgChart? Have! - Automating Organizational Charts with PowerShell and diagrams.net
Options
- Mark as New
- Bookmark
- Subscribe
- Mute
- Subscribe to RSS Feed
- Permalink
- Report Inappropriate Content
04-18-2024 06:44 AM - edited 04-18-2024 06:47 AM
Hi Folks
You might need an Org Chart once in a while and why not create it from your User- and Employment Information in JumpCloud?
I came up with a script for you which produces a CSV for further consumption in Diagram.net (formerly known as draw.io).
How?
1. Run this script to generate the CSV file.
2. Open diagrams.net (https://app.diagrams.net).
3. Start a new diagram or open an existing one.
4. Go to 'Arrange' in the menu, then 'Insert', then 'Advanced', and select 'CSV...'.
5. In the dialog box that opens, click 'Choose File' and select the generated CSV file or paste the CSV text directly into the text area.
6. Review the preview to ensure the diagram appears as expected.
7. Click 'Import' to add the generated diagram to your canvas.
8. Click 'Arrange', then 'Layout', and select a 'Org Chart' to organize the diagram.
9. Adjust styles and layouts as necessary using diagrams.net tools.
You will get a highly customizable Chart like this:
You will get a highly customizable Chart like this:

The entire script (linked above to my GitHub):
<#
.SYNOPSIS
This script generates a CSV file formatted for importing into diagrams.net to create an organizational chart.

.DESCRIPTION
This PowerShell script fetches user data from JumpCloud, formats it, and exports it to a CSV file.
The CSV is specifically formatted to work with diagrams.net, including configurations for visual styles and connections.

.INSTRUCTIONS
1. Run this script to generate the CSV file.
2. Open diagrams.net (https://app.diagrams.net).
3. Start a new diagram or open an existing one.
4. Go to 'Arrange' in the menu, then 'Insert', then 'Advanced', and select 'CSV...'.
5. In the dialog box that opens, click 'Choose File' and select the generated CSV file or paste the CSV text directly into the text area.
6. Review the preview to ensure the diagram appears as expected.
7. Click 'Import' to add the generated diagram to your canvas.
8. Click 'Arrange', then 'Layout', and select a 'Org Chart' to organize the diagram.
9. Adjust styles and layouts as necessary using diagrams.net tools.

.NOTES
- Ensure that the API key and endpoint URL are correctly set before running the script.
- The CSV file includes configurations that define how nodes and edges appear, based on the columns in the CSV.
#>

# Define your variables here:
# - JumpCloud
#   - API Key: Your JumpCloud API Key
# - CSV
#   - Path: Path to save the CSV file
# - Image
#   - URL: URL to the image to use for the diagram

$JumpCloudApiKey = 'YOUR_JUMPCLOUD_API_KEY'
$CsvPath = "./OrganizationalChart.csv"
$ImageURL = "https://cdn3.iconfinder.com/data/icons/user-avatars-1/512/users-10-3-128.png"

# Function to get user data from JumpCloud
function Get-JumpCloudData {
    $Headers = @{
        'x-api-key' = $JumpCloudApiKey
        'Content-Type' = 'application/json'
        'Accept' = 'application/json'
    }
    $ApiUrl = 'https://console.jumpcloud.com/api/systemusers'
    $Response = Invoke-RestMethod -Uri $ApiUrl -Method Get -Headers $Headers
    return $Response.results
}

# Function to export user data to CSV formatted for diagrams.net with relationships
function Export-ToCsv {
    param ($Users)

    # Initial configuration for diagrams.net as comments in CSV, including connection configurations
    # Reference: https://www.drawio.com/blog/insert-from-csv

    $CsvData = @(
        "## Example CSV import. Use ## for comments and # for configuration. Paste CSV below.",
        "# label: %name%<br><i style='color:gray;'>%position%</i><br><a href='mailto:%email%'>Email</a>",
        "# style: label;image=%image%;whiteSpace=wrap;html=1;rounded=1;fillColor=%fill%;strokeColor=%stroke%;",
        "# connect: {""from"": ""manager"", ""to"": ""id"", ""invert"": true, ""style"": ""curved=1;endArrow=blockThin;endFill=1;fontSize=11;""}",
        "# layout: auto",
        "## ---- CSV below this line. First line are column names. ----",
        "id,name,position,email,manager,fill,stroke,image"
    )

    foreach ($User in $Users) {
        # Concatenate Firstname and Lastname with username
        $FullName = $User.firstname + " " + $User.lastname
        $UserName = if ($FullName -ne " ") { $FullName } else { $User.username }

        $Position = $User.jobTitle
        $Email = $User.email
        $ManagerId = $User.manager
        $UserId = $User._id
        $FillColor = "default"  # Example default color
        $StrokeColor = "#82b366"  # Example stroke color
        $Image = "https://cdn3.iconfinder.com/data/icons/user-avatars-1/512/users-10-3-128.png"  # Example image URL

        $Manager = $Users | Where-Object { $_._id -eq $ManagerId } | Select-Object -ExpandProperty username -ErrorAction SilentlyContinue
        $ManagerName = if ($Manager) { $Users | Where-Object { $_._id -eq $ManagerId } | Select-Object -ExpandProperty _id -ErrorAction SilentlyContinue } else { "" }

        # Add user details to CSV data
        $CsvData += "$UserId,$UserName,$Position,$Email,$ManagerName,$FillColor,$StrokeColor,$Image"
    }

    # Write data to CSV file, ensuring escape of internal quotes
    $CsvData | Out-File -FilePath $CsvPath -Encoding UTF8
    Write-Host "CSV file has been created at $CsvPath"
}

# Execution
$Users = Get-JumpCloudData
Export-ToCsv -Users $Users
Enjoy and thanks for reading
-Juergen
Labels:
- Labels:
-
API
-
PowerShell
1 REPLY 1
Options
- Mark as New
- Bookmark
- Subscribe
- Mute
- Subscribe to RSS Feed
- Permalink
- Report Inappropriate Content
04-18-2024 09:20 AM
You are too cool @JuergenKlaassen 😎